Tuesday, January 31, 2012

Superman Birthday Cake!


My nephew celebrated his third birthday party this past weekend and the theme was Superman!  It look a long time to come to the decision and understanding that only one theme could be chosen for the little guy.  I thought I was going to have to pull off a Batman/Superman cake and was totally perplexed about that one until he finally settled on the idea of a Superman party!  It was a really fun event at a kids gym with lots of things to jump on, into and off of...the kids (and adults) had a blast!  My sister made super cute capes for all the kids and had some fun themed treats out to set the theme.  The only request that my nephew had was that the cake be chocolate with chocolate frosting so I used my favorite recipe from http://www.kevinandamanda.com/ and a frosting recipe I came across from http://www.savorysweetlife.com/.  The recipes I used are below:


Cake:
The Best Chocolate Cake Ever

1 box devil’s food cake mix
1 small pkg Jello instant chocolate pudding mix
1 cup sour cream
1 cup vegetable oil
4 eggs, beaten
1/2 cup milk
1 tsp vanilla
2 cups mini chocolate chips
Preheat oven to 350 degrees F. In a very large bowl, mix together everything except chocolate chips. Batter will be thick. Stir in the chocolate chips. Pour batter into cake pan of choice (I normally use two 9-inch pie pans). For cooking time, I use the cooking times on the back of the devil’s food cake box as a guide and usually add 10 mins to whatever it says. Then I do the toothpick check, and if it’s not done, I check on it every 5 mins after that. It usually takes around 45 mins for two, 9-inch pie pans.


Read More http://www.kevinandamanda.com/recipes/dessert/the-best-chocolate-cake.html#ixzz1l2y4nLn3
Frosting:
Chocolate Buttercream Frosting
  •  1 cup unsalted butter (2 sticks or 1/2 pound), softened (but not melted!)
  • 3 1/2 cups confectioners (powdered) sugar
  • 1/2 cup cocoa powder
  • 1/2 teaspoon table salt
  • 2 teaspoons vanilla extract or 1 teaspoon almond extract
  • 4 tablespoons milk or heavy cream
Instructions
  1. Cream butter for a few minutes in a mixer with the paddle attachment on medium speed. Turn off the mixer. Sift 3 cups powdered sugar and cocoa into the mixing bowl. Turn your mixer on the lowest speed (so the dry ingredients do not blow everywhere) until the sugar and cocoa are absorbed by the butter. Increase mixer speed to medium and add vanilla extract, salt, and milk/cream and beat for 3 minutes. If your frosting needs a more stiff consistency, add a little more sugar. If your frosting needs to be thinned out, add additional milk 1 tablespoon at a time.
Recipe by Savory Sweet Life - Easy Recipes from an Everyday Home Cook at http://savorysweetlife.com/2011/04/chocolate-buttercream-frosting/
Using the above recipes my process went a little something like this:
1. Prep cake and bake first two layers in 2 square pans.
2. Prep frosting while first layers bake.
3. Remove cake from oven, wait 10 mins, release onto cooling racks.
4. Bake the second two layers.
5. More frosting...weeee!!!  The mixer is only so big...not large enough for 4 batches of frosting!
6. Remove cake from oven, wait 10 mins, release onto cooling racks.
7. Cut portion off of first two layers to make Superman shape.
8. Place full sized square cake on wax paper covered cardboard, then frost, second full square, frost.  Here I inserted a few straws into the cake and cut them at the top of the frosting to keep the layers together as I stacked.  
9. Place cut layer on top of stack, frost, next layer, frost...then frost the whole thing!...Like I said...there is always lots of frosting on my birthday cakes!
10. Start decorating!  I printed an image of the Superman logo and set it next to the cake and then applied Sixlets candies (I bought mine at Party City) to the top of the cake to achieve the logo first. 
11. Then I would go around the four sides and follow a pattern of sixlets around and around so it looked like they were angled stripes...I think it turned out super cute!
12.  With the remainder cake (cut from the square layer to make Superman Logo), I attempted to make Cake Balls.  I mixed the cake with frosting and then dropped spoonfuls onto a baking sheet and put it in the freezer for a few minutes.  Then I removed the sheet, rolled the spoonfuls into a ball shape and dipped them in Candy Coating and applied cute deco to jazz it up!
I was so happy that this cake came together and it was a big hit at the party!  I am always holding my breath the whole way driving to the party when have a cake like this on my lap.  I kept telling myself..."it's ok...if he hits a pot hole we can just go to Publix...it will all be fine..." Haha...luckily we didn't have to make any stops on our way there!
Happy Baking and Happy Superman Birthday to my Super Nephew!

Thursday, January 26, 2012

Healthy Eggplant Lasagna

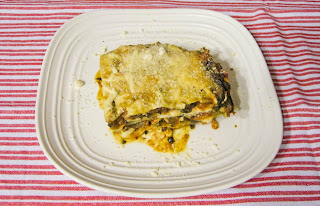
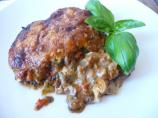
This dish...although it sounds too healthy to be yummy...is SO yummy!  It seems like I am always looking for a healthy, delicious recipe and this may be my new go to!  I found the recipe online at Food.com after hearing about interesting diet guidelines from several friends who are on the Paleo diet.  The pictures below are from my lasagna (Bryan LOVED it by the way...even without noodles) which I think turned out so pretty.  The picture embedded in the recipe below is from Food.com. Just look at all that cheesy lasagna goodness in my pics...YUM!!!  Let me know what you think!


I Lost My Noodles! Low Carb/South Beach Eggplant Lasagna

By PattiCakeB on February 09, 2004
Photo
Photo by Tea Jenny
109 Reviews
  • timer
  • Prep Time: 15 mins
  • Total Time: 1 hrs 45 mins
  • Servings: 8

About This Recipe

"I was looking for a yummy South Beach recipe to curb my Italian Cravings. I found a vegetarian lasagna recipe using eggplant slices as noodles, substituted my own meat sauce, and voila! A low carb keeper in our home! The eggplant taste is indistinguishable with all of the bold italian flavors, and adds the needed texture of the missing noodles. I've also seen zucchini strips used as the mock noodles. Try it!"

Ingredients

    Mock Noodles

    • 2 large eggplants, peeled, sliced lengthwise into 1/4 inch noodle-like strips
    • cooking spray ( olive oil spray is best)
    • salt and pepper

    Meat Sauce

    • 1 1/2 lbs ground sirloin or 1 1/2 lbs turkey breast or 1 1/2 lbs Italian sausage
    • 2 tablespoons olive oil
    • 2 onions, chopped
    • 3 cloves chopped garlic
    • 1 red peppers, chopped
    • 1 (16 ounce) packages sliced mushrooms
    • 2 tablespoons italian seasoning ( or mix of oregano, basil and thyme)
    • 1 teaspoon fennel seeds (optional)
    • salt and pepper
    • 1 teaspoon red pepper flakes ( if you dare!) (optional)
    • 1 (10 ounce) packages frozen chopped spinach
    • 1 cup red wine (optional) or 1 cup vodka (optional)
    • 1 (28 ounce) cans tomato sauce ( or large jar sugar free sauce if you can find it)
    • 1 (15 ounce) cans diced tomatoes ( for less sugar, 3 chopped roma tomatoes)

    Cheese Mixture

    • 2 cups low-fat ricotta cheese
    • 2 eggs

Ingredients

  • 3 green onions, chopped
  • 3 cups shredded lowfat mozzarella cheese
  • 1/2 cup parmesan cheese

Directions

  1. Preheat oven to 425 degrees.
  2. Spray cookie sheet, arrange eggplant slices and season with salt and pepper.
  3. Cook slices 5 minutes on each side.
  4. Lower oven temp to 375.
  5. Brown meat, onion and garlic in olive oil for 5 minutes.
  6. Add red pepper and mushrooms, and cook 5 minutes.
  7. Add spinach, tomatoes, spices and wine and simmer for 5-10 minutes.
  8. Blend ricotta, egg and onion mixture.
  9. Spread 1/3 of meat sauce in bottom of 9” x 13” glass pan.
  10. Layer ½ eggplant slices, ½ ricotta, 1/3 mozzarella and parmesan.
  11. Repeat.
  12. Add last layer of sauce, then mozzarella and parmesan on top.
  13. Cover with foil and bake at 375 degrees for 1 hour.
  14. Remove foil and bake or broil another 5-10 minutes until cheese is browned.
  15. Let it rest 10 minutes before slicing, if you can wait that long!

Nutrition Facts

Serving Size: 1 (651 g)
Servings Per Recipe: 8
Amount Per Serving           % Daily Value
Calories 449.3
Calories from Fat 187         41%
Total Fat 20.8g                   32%
Saturated Fat 8.5g              42%
Cholesterol 126.3mg           42%
Sugars 12.6 g
Sodium 811.3mg                33%
Total Carbohydrate 33.4g   11%
Dietary Fiber 9.7g              39%
Sugars 12.6 g                     50%
Protein 36.1g                      72%

Tuesday, January 24, 2012

Long time no blog!

Ok, sorry it has been so long since I have blogged!  Is it sad to say that I am finally recovered from the holidays and it's almost February?!  Hehe!

We have been busy around the house lately and I wanted to share a few projects!  I finally had a few photos from our wedding printed and used http://www.myphotopipe.com.  What a great website!  I was having a hard time finding a way to get prints made for a reasonable price to fit specific frames and this site was perfect.  Very easy and inexpensive!  I printed four 10X13 pics and framed them in our long hallway.  I think it looks great...minimalist, clean, but still pretty...just how I like it!

I tried about 10 times to get this pic to rotate but alas I cannot get it to turn...just tilt your head to the left...yes...that's it! :)

The next project I took on was to make a headboard!  Our bedroom is definitely lacking attention as far as our house goes and it was high time to give our bed an update.  I found an awesome curtain at Cost Plus World Market that I thought would pull the pillow colors and the colors of our IKEA rug all together well.  Bryan and I went to Home Depot and picked up a piece of wood (just inexpensive chip wood...our piece was only $6!).  It works out perfectly there because you can have it cut to exactly the size you need...love that!  Then I went to JoAnn's Fabrics and picked up padding (which was half off...YAY!) and a few buttons.  I brought everything home and laid the curtain out flat on the floor after ironing it.  Next I drilled 3 holes in the wood so I could "sew" the buttons through the backing and ensure that there was a puff of padding around the buttons and also attached two picture hanging thingies to the back.  Then I wrapped the wood with the padding and laid it on top of the curtain...careful to make sure the remaining fabric on either side of the wood was equal so the pattern would not be askew.  Then I used a staple gun to attach the curtain to the wood starting with the short sides first, then the long sides.  Make sure you pull the fabric taught and try to staple in the same place along the edge so the pattern won't get nutty.  Next up is the buttons!  I started in the back and used a needle and thread to go through the hole I previously drilled, pierce the fabric and then attach the button on the front.  I pulled it tight, inserted the need back into the front of the fabric and pulled it back through the hole in the back.  There was pretty much not way to go back to the front after the initial pull so I just made that single attempt very strong.  I attached the thread to the two hanging thingies and a screw that I added just above the hole on the back.  It sounds confusing but it was really somewhat easy!  Last of all is hanging it on the wall and Voila!


I was so proud!
After removing all of our Christmas decor (so sad) our house looked a little barren!  I, of course, was able to remedy this with a trip to IKEA and Home Goods. :) 


Ok...this is going to be a problem...does anyone know how to turn these pics??

I am loving having a home that I can decorate and make changes to!  Our love nest is starting to feel more homey with every trip to Home Depot I make!  My husband is a doll and always willing to help me with my ideas...he's the best!


And what a stud muffin...whew!! 

Wednesday, January 4, 2012

Holiday gifts!

This Christmas brought so many blessings and such an abundance of family time and special moments.  We were in Texas visiting my family this year and just had a wonderful visit!  I was thrilled to also be able to create two Christmas gifts for 'clients' and am posting the images below.  I was excited to do the portrait of one client and her daughter as a gift for her parents and was told they loved their gift!  The beach house drawing was a lot of fun to do as well and was a gift for my sister's in laws who have a new beach house that is currently under construction. Their original beach home was completely destroyed by a hurricane several years ago and so this has been an exciting new venture for them.  They loved it as well and even mentioned to my sister that they would like a similar drawing done of their original beach home so they can hang the drawings side by side...I love this idea!  I hope you like them! Feel free to contact me if you'd like a special drawing or piece of artwork! :)